Tuesday 11 June 2013

What is the Default Printer or Primary Printer?

Today’s How-To Guide for the computer beginner lesson we will talk about the  “Default Printer”.

Keep in mind that Default Printer and Primary Printer are the same thing.  I have noticed that people use both terms for this.  Yes, most of the time they mean the same thing.

The Topics covered today are:
  • What is the default printer?  What is the primary Printer?
  • How do I identify which printer is my default printer? Or Primary Printer?
  • How do I change my default printer or primary printer?

What is the Default Printer Or Primary Printer?
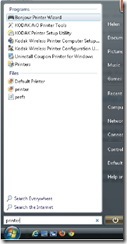
list of printersThe Default Printer is basically the Primary Printer you want to setup to use to print with.  Keep in mind we are using a machine, and YES you need to tell the machine WHICH printer you are going to use MOST of the time! 

Your computer will DEFAULT to this printer whenever you want to print something.  That is NOT to say you can’t change your mind, and use a different one you may have.  That’s possible of course, but there will be a default printer.  This primary printer  the computer will automatically use unless you tell the computer otherwise.
Depending on your circumstance at your computer location one printer should be already set as the ‘default’ printer. 
I have noticed that some computers switch the default or primary printer for various reasons, and people think their printer or computer is broken.  Checking the default maybe the only thing you need to fix.
One thing I have noticed from time to time is certain software will change your primary printer to something that works better (in their opinion) for their program. In the picture above I was on a friend’s computer, and clicked the start button and searched for ‘printer’. 
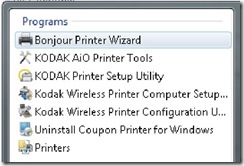
software printers
Here is a close up shot, and keep in mind my friend wants the ‘Kodak’ printer as her primary printer, or default printer.  Notice the Bonjour and the Coupon printer on the list?  Those are examples of extras that some software programs ADD, because it works better with their program.  These are two examples of MANY of course!

So how do you know which printer is the primary printer or the default printer?

What printer is my default printer or primary printer?

Most of the time when you are looking for the primary or default printer is because you are having some sort of printing problem.  It could also be that your printer died, and you bought a new one…yet that isn’t printing!
There can be many reasons WHY all of a sudden a printer isn’t working.  So check a couple of things first, and then we will make sure your ‘choice’ of printer is set as the default or primary printer.
  • Are the Cables or Cords loose?  Are they connected where they need to be?
  • Is the power on for the printer?
  • Is there enough ink, or is there paper in the printer?
Okay.  Now that you have checked those LETS move ON!

You need to go to your control panel on your computer.  If you don’t know what that is click on the words control panel in the last sentence, and it will bring you to a lesson to show you HOW to find it!
(In Windows XP click Start button, then select Printers and Faxes.
In Windows Vista click Start button, click Control Panel, click Hardware and Sound, click Printers.
In Windows 7 click Start button, click Devices and Printers.)

We need to find the printer section of the control panel, and click on that.  Below are two printer sections on the control panel.  Printers are considered a piece of hardware on your computer!
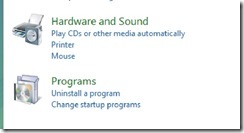
control panel hardware printer Select to change to default or primary printer


Notice above you find the word ‘printer’ under hardware and sound. 
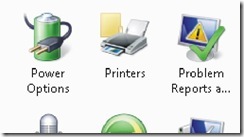
classic view printer control panel to change to primary printer default printer
If you have a classic view of the control panel your icons above will be in alphabetical order, and you need to find the ‘printer/s’ icon.

Now that you located the printer section in the control panel click on that section to open the next screen.

list of printers in control panel hardware section

Keep in mind some screens may look a little different, but you are looking for the ‘names’ of the printers!  Your screen could be pictures of the printers, or a list of printers.   Don’t worry its basically the same thing – all we need to concern ourselves with is the NAMES of the printers!  You notice above I have three listed above. The Kodak, Microsoft XPS, and Snagit 10. 
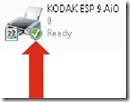
kodak default printer or primary printer see green check mark to identifyNotice my friend’s Kodak ESP 9 AiO printer in the picture?  That is her primary or default printer.  I can tell because you notice it as the green checkmark.  Your printer may not show a green check mark, but there should be some check – or symbol showing you THIS is the default or primary printer! 

Notice that the other printers do NOT have this symbol!  You are you basically looking for something that is different – in this case the green check mark – to identify which is the primary printer or what the computer calls the default printer.

How do you change the Primary Printer or the Default Printer?


list of printers in control panel hardware section

As I mentioned above the Kodak printer in this picture is the default printer.  What if I wanted to change it to the Microsoft XPS document printer instead?

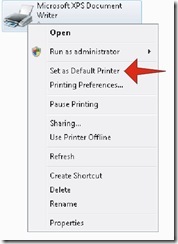
Click on that Microsoft Printer, and it will highlight to show you have selected it.Set as Default Printer Option Primary Printer  Notice the light blue box around it?  In this picture I have also right clicked, and you see the menu options.

You would then move your mouse pointer DOWN to ‘Set as Default Printer’, and click once the ‘set as default printer’ is highlighted. 

Please note:  Some computer are picky on how far the mouse pointer can go (left or right), and you find the menu disappears if you go over to far.  Just try it again, and go slower until you find that soft spot your particular computer likes.

There is a second way to do this within the same menu if you have trouble with the options above.

Set As Default option to select primary Printer
Notice once again I clicked the Microsoft Printer, and its highlighted.  Now look to the top of the menu box, and you see the words, ‘set as default’.  Click on that spot.  You check mark should change to the printer you have chosen.

new default printer
See how easy is that?
You change this as often as you want – or need too.  Most people don’t change it at all. 

If something is not clear, or you feel something should be added to our lesson? Please feel free to leave your comment or question in section we provided.


Also please subscribe by leaving your email in the box supplied, and you will received future lessons by email as they come out.

Thank you for reading our How-To Guide for the Computer Beginner
and our Lesson on the Default or Primary Printer!
Monday 27 May 2013

How-To Arrange Desktop Icons

How-To Arrange Desktop IconsToday we are going to learn How-To arrange Icons on your computer desktop.
Just so we are clear on the instructions here is a picture of a desktop.  The computer desktop itself is the picture of the hills and clouds! 
The Icons on the desktop in the picture are named:  My documents, My Computer, Recycle Bin, and Internet Explorer.
I’m normally asked a couple of questions about arranging desktop icons or organizing the icons on the desktop.  So lets go quickly over a couple of different options!
First I will go over some more traditional ways to organize your icons, and they show you a way you can organize they WAY you want THEM!
Topics covered today will be:
  • How-To Find Arrange Desktop Icons Menu
  • What is ‘auto arrange’, and how to turn that option off and on.
  • Sort Icons by options, and What do the different options Mean?
  • How To Arrange the Desktop Icons where I want them, and how to organize them by using the Grid. 
  • How to Arrange the Desktop Icons how I want them, and NOT use the grid
First lets go to the spot where all the magic happens!  We need to find the menu to do ALL the changes NEEDED!

Arrange Desktop Icons

We want to find an open space on your computer desktop, and then right click with your mouse pointer ON the desktop, and NOT on top one of the icons.
For example you notice the mouse pointer in the above picture is NOT on top of any of the desktop icons pictured.
Below I have pictured menus that will come up depending on your operating system
Right Click on Desktop
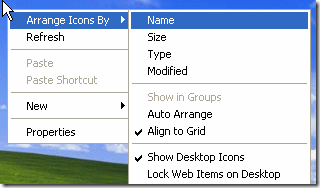
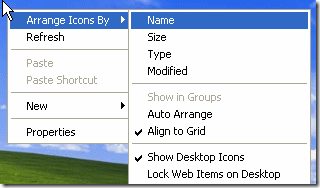
This would be Right Click on Desktop for Windows XP, and we are hovering over the ‘arrange icons by” option. (notice how its highlighted in DARK blue when you hover over it) 
right click on desktop Vista
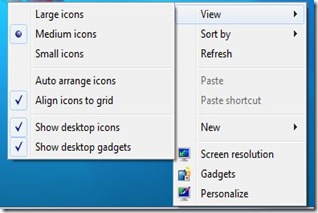
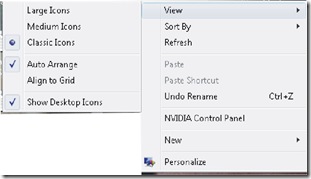
Right Click on Computer Desktop Menu for Windows Vista when you hover OVER the “View” Option.  Notice how VIEW looks different in the background color compared to the other options.  In this lesson we will be using the ‘view’ area.
right click on desktop windows 7
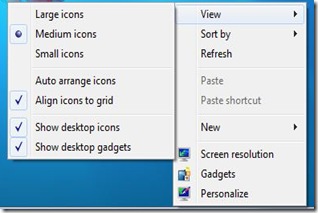
Menu for Windows 7 when you hover over the “VIEW” option that we will use today. 
Keep in mind you may have to use this step over and over again to make all the changes you want to your computer desktop.  When you select just ONE change the menu above will disappear, and you have to do this step all over again to make the next change. 

How-To Turn on Auto Arrange Desktop Icons

With any of the above operating systems you need to find an item on the list called, ‘auto arrange icons’. Look at the pictures above to see where you might find that option.
If you want the icons to be automatically arranged, click Auto Arrange.  This option is normally done by Default.
check auto arrange
If you see the check mark next to auto arrange that means you have selected it, or it maybe already selected for you (ie: by default). 

How do you turn OFF Auto Arrange Icons?

uncheck auto arrange
Of course absence of the check mark means you have removed the option of the computer desktop being automatically arranged. 
So if you want to turn OFF the auto arrange which is normally the ‘default’ setting for computer desktops hover down and CLICK this option to remove the check mark.  It should look similar to my picture above when turn OFF this option.
At this point the menu should disappear altogether after you made your choice.  If not?  Click on the computer desktop again.

Arrange Icons By Options

Right Click on Desktop
In the Windows XP menu you will see in the above picture a couple of different options. 
What do the arrange Icons By options mean?
Name  -  Arrange icons in alphabetical order by the icon name.
Size  -  Arrange icons in order of file size. If the icon is a shortcut to a program, the size refers to the size of the shortcut file.
Type  -  Arrange icons in order of type. For example, if you have shortcuts to several PowerPoint presentations on your desktop, these will be arranged next to each other.
Modified  -  Arrange icons in the order that the shortcut was last modified.
Hover over to your option, and click on the option you feel is the best for you.  YES you can change that option if you don’t like it to something else!  Just start over by right clicking on desktop once again.
You can find these sort by options for Windows Vista and Windows 7 as well.
Remember to right click on that free space on the desktop once again, and then look for the ‘sort by’ option.
right click on desktop windows 7
You notice the arrow on the right side of this optiVista Icon Sort By Optionson?  If you hover over the SORT by the list of options will appear. 

You are able to pick which you would like to use, or change the option once again if you don’t like it.
Just hover down to your option, and CLICK on it when it highlights.
Your menu should disappear once you make your changes, and if you not?  Click on computer desktop.

Organize Desktop Icons The Way I Want Them

You can move your desktop Icons anywhere you want them on your computer Desktop.
computer desktop
When you have the Auto Arrange Option Clicked – or is in use by default you can’t move your icons around to places you may want them.
The picture above you will see icons arranged all around his picture of a cool car, and an airplane.  You also notice his icons are still lined up, but placed where he decided to put them! 
How do you do that?
First, you need to make sure your ‘auto arrange’ option is turned off like we showed you above.  Right Click on Desktop, and look for this option to make sure check mark is removed.  Hover over and click on the option if it is NOT!
uncheck auto arrange
Notice NO check mark?  It has been turned off!
Now some people still like to see SOME sense of order as far as the icons being lined up orderly.  The computer desktop has what is called a gird.
Once again – right click on computer desktop.
In Windows XP you will find the option for the grid under the Arrange Icons By section. 
Notice that the auto arrange doesn’t have a check mark next to it, but the align to Grid does? (list on right side, under NAME)
Right Click on Desktop
These are the options you want!
right click on desktop windows 7
Windows Vista and Windows 7 are similar, but hover over the ‘VIEW’ section.  Notice the ‘auto arrange icons’ is NOT checked, but the ‘Align Icons to Grid’ is?  That is what you WANT!
right click on desktop windows 7
Now if the grid is to restrictive for you?  You of course do not have to use that option!

Arranging Icons on Your Computer Desktop

I will tell you if you are NEW computer user, or have a new computer at times these menus can be frustrating.  They disappear before your able to make the changes you want, or the menu seems to close before you can see anything.
Be patient, and go a bit slower at times to figure out how sensitive your machine can be.  Its not usual to have to do this a couple of times, and it happens the best of US!
I will mention at times you may need to refresh you computer desktop to see the changes you have done.  When you right click on your computer desktop?  Look for the ‘refresh’ option, and hover over to click on it.  The screen sometimes flutters a bit, and then you can see your finished product!  Most of the time with newer machines this isn’t needed.  You see your changes right away!
I hope our lesson on Desktop Icon Arrangement was helpful!
If something is not clear, or you feel something should be added to our lesson? Please feel free to leave your comment or question in section we provided.


Also please subscribe by leaving your email in the box supplied, and you will received future lessons by email as they come out.

Thank you for reading our How-To Guide for the Computer Beginner

Sunday 19 May 2013

What is a Cloud?

Cloud Computing Australia

What is the Cloud?

Today we are going to write about the term ‘The Cloud”.

No doubt you have heard the term before either in print, or in the media.

What is the Cloud?  Its basically a fancy word for online storage space.

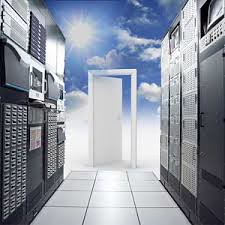
Storing something in the cloud is basically storing something on what they call a computer server at a different location.    If you look at the picture those TALL machines (on the right and left) are examples of computer servers.

Confused yet?  Let me give you a more basic example!

Where is the Cloud?

yahoo email old screen grab

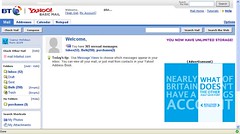
Let’s say you have an email account at home with Yahoo, and you sign into your Yahoo account to see if you have any emails (the above picture).  The server at Yahoo SENDS those emails to your account so you can read them (From your web browser or internet browser).  Those emails were basically being stored on the server, and that technically is in the ‘cloud’.  Yahoo’s servers ARE the storage space.  They are the ‘cloud’ in this example.

In this case, Where is the Cloud?  At Yahoo!

email inbox

No doubt you have noticed the folders in your email program similar the ones  I have pictured here.  The inbox, Draft, Sent, Bulk, Trash, and in this case a custom folder the computer user made called ‘purchases’.

Unless you delete the emails in these folders they will forever be stored in the ‘cloud’ at Yahoo.  They will be there each and every time you sign into your yahoo email account online.  Your emails are stored at Yahoo on their computer servers (their cloud), and can be accessed anywhere you sign into your email account.

Yes, ANYWHERE you sign IN!

Other basic examples of Clouds would be Facebook, Google Doc’s, or Flicker.

The all have their own servers, so those are all different Clouds!  People can upload their documents to Google Doc’s, or pictures to Flicker!  Depending on the service access to your files, pictures, etc can be limited to you, a group you choice, or open to the public.  You need to read the terms for each location.

What do you do in the Cloud?

Lets say for example, you are at Fran’s house on vacation.  You are expecting some pictures from your grandchildren’s soccer game, and they were going to email them to you.  Fran tells you to use her computer to see if they have emailed them to you yet, because she wants to see them TOO!

You go to the Yahoo website, and you sign into your account – like you do at home! Since your emails are stored on the yahoo cloud – and NOT your home computer – you can access your new emails from Fran’s house.   Now you and Fran are enjoying the soccer pictures! 

It would be the same principal if you stayed a hotel near Fran’s house, and the lobby of the hotel has a computer with internet connection for their guests to use. Yahoo’s servers (the cloud) will send those emails to you WHERE EVER you are!  As long as you don’t delete the email those pictures will stay in cloud for as LONG as you keep them there!

Another example of how to use the cloud would be to upload those soccer pictures to flicker, or some other site you choose to display your photos!  This would be a separate cloud, because they have their own servers.  Granted, some sites like google have many different aspects to their services.  For example, they are connected to youtube.  So your Google Docs and Youtube Videos are both on GOOGLE clouds – or their servers.

Most of the time when we speak of computer storage it refers to our computer itself!  For example, you are starting to write a article using your Word Program about your trip to Germany for a newsletter.  When you are done working on it for the day you ‘save it’ on the computer’s hard drive, disk drive, or maybe even a CD Rom for example.  All your work is saved, and you can finish it later!

The cloud has the same principal of storage, but the storage is ONLINE! 

What is Cloud Computing?

So you are still at Fran’s house, and she is going to Germany next year.  She wants to see what you have written so far about your trip!  Unless you have your computer with you, or your disk drive, or CD rom you won’t be able to show her.  Right?  You would have to be at YOUR computer at home to open it, and then show her the story for the newsletter.

Now if you have stored your article in the Cloud (online storage server), and your friend Fran has a computer with internet connection?  You can sign into that storage cloud where your file is – place the computer file in HER word program – and she can read it.  In some cases you can even read it online IN the cloud itself (in the computer browser)!

Let me use a more basic example!

So lets pretend that you uploaded your Germany article to Google docs (short for documents).  While you are at Fran’s house you can both read the article, and lets say Fran sees you have misspelled a word.  You can correct your grammar right there, and once you get home the document will still be corrected.  Yes, its similar to how you SAVE your work on your computer as well!  You are basically doing it online!

The cloud is a place some people use as a backup for their computer files.  That way if their computer broke, or a tragedy happened like your house caught on fire?  The computer maybe gone, but your files are still in the CLOUD online.  Think of it as ‘off sight’ storage!

Businesses can use the cloud in a similar way as we saw Fran help you with your misspelled word on your article.  They can have a group project ‘in the cloud’, and the employees can all work on the project in REAL TIME!  For example, Jack wants to add a picture to make the point more clear.  Jane feels a graph is also needed.  Jack could be in New York, and Jane could be in Texas.  Since they are in cloud?  They can both add these things, and they the both can see the additions. 


I hope these basic examples of What is the Cloud, Where is the Cloud, What do you do in the Cloud, and What is Cloud Computing helps you understand these terms more.

If something is not clear, or you feel something should be added to our lesson? Please feel free to leave your comment or question in section we provided.


Also please subscribe by leaving your email in the box supplied, and you will received future lessons by email as they come out.

Thank you for reading our How-To Guide for the Computer Beginner

Tuesday 12 March 2013

Surface Pro Sales Reach 400,000 in Only a Month

Since its launch, the Surface tablet from Microsoft has reached 400,000 sales, which isn't a bad start for a tablet that is definitely on the pricey side with an $899 price tag. What's even more impressive is that this tablet only launched a month ago. According to IDC Analyst Bob O'Donnell, "That's a respectable number and it leads me to believe that Surface Pro will end up outselling Surface RT."

O'Donnell is, of course, referring to the RT version of the Surface tablet, which is slightly less expensive at $499, though isn't compatible with older Windows software. "It's something that we've predicated all along because of the compatibility that Surface Pro offers," O'Donnell added. Overall, Microsoft has sold nearly 1.5 million Surface devices, including both Pro and RT versions, and was announced only three months ago.

Even though the RT version sold out initially, Microsoft was surprisingly able to keep up with demand quickly. Unfortunately, that hasn't been the case with the Pro. The high-end, 128GB Pro version of Surface has been continuously sold out since it was released on February 9. This model of the Surface tablet has only recently become readily available in the last week or so.

Regardless, the numbers being put up by the Pro are nothing compared to that of Apple's iPad. Apple sold more than 20 million iPads in the quarter ending in December, though Apple has been in this market substantially longer than Microsoft has and has also had time to fine tune its device. However, like Surface RT, the 9.7" Retina iPad starts at $499 while the iPad Mini is even cheaper at $329.

The trick with the Surface is that it puts a conventional, mainstream laptop into a 2 lb, 0.5" thick tablet. The Pro version comes with a 10.6" 1,920 x 1,080 full HD resolution display, Intel Ivy Bridge processor, 4GB of memory and a full-fledged solid-state drive, which is exponentially faster than the flash drives found in Apple and Android tablets.

Nonetheless, the numbers posted by Microsoft are impressive, especially considering the lackluster reviews that Windows 8 has been receiving. Windows 8 is the operating system that the Surface uses, though the OS has clearly been designed for use on touchscreen devices. It will be interesting to see what kind of numbers this tablet will post in the coming months.

Source: CNET - Microsoft Surface Pro sales hit 400K in a hurry

Tuesday 12 February 2013

Windows 8 Pro Discount Officially Ended

Well, it's official, you can no longer purchase an upgrade to Windows 8 Pro for the discounted price of $39.99. As of February 1, Microsoft has quintupled the price to $199.99. Just upgrading to the standard Windows 8, which doesn't include corporate features like BitLocker encryption and the ability to remotely connect to a company's network, will cost $119.99, though that edition was never discounted.

Upgrading to Windows 8 from an existing Windows operating system, like XP, Vista or 7, comes with varying degrees of success. It should come as no surprise that upgrading from Windows 7 causes the least amount of hassle with bringing along existing files, settings and applications whereas upgrading from XP is a little more difficult.

In addition to the end of the discount, several other deals also ended, including $69.99 prices for Windows 8 Pro on a DVD and something Microsoft was calling Windows 8 Pro Pack, which upgrades Windows 8 to Windows 8 Pro. The first upgrade will jump to $199.99 with the latter costing $99.99. Windows 8 Media Center pack, which is an add-on that makes it possible to play CDs and DVDs on a Windows PC, now costs $9.99.

Only one time has Microsoft discussed Windows 8 Pro upgrade numbers. This occurred back in October when CEO Steve Ballmer said his company had sold 4 million copies in its first three days. Since then, Microsoft has declined to give any specific sales numbers, even though the firm's CFO recently cited upgrades as one of several reasons why the Windows division's revenue increased 11% in the fourth quarter of 2012.


Purchasers of the Windows 8 upgrade do not have to install it right away. Instead, they can create a bootable flash drive or installation DVD, then set aside the physical media for a later date. The final offer that recently expired was the eight-month deal that offered a $14.99 upgrade for customers who purchased a Windows 7-powered PC between June 2, 2012 and January 31, 2013. Those customers have until February 28 to claim the promotional code for the $14.99 price.

Windows 8 has received quite a bit of flak from users who believe that the heavy focus on touch-screen features do not translate well to desktops and laptops without touchscreens. Having used Windows 8 personally, I can honestly say that the new home screen and layout definitely take some getting used to, especially for long-time Windows users, though some of the features that are available are pretty cool and the operating system itself isn't all that bad (though that was at the time of the $39.99 download). I don't know if the operating system (or any, for that matter) is worth $200. 

Thursday 10 January 2013

Lenovo Reveals 2 New Models

In February of 2002, Lenovo came in to being. 10 years later, Lenovo is now the top computer manufacturer in the world. In January 2013, Lenovo revealed 3 new computer designs at the Consumer Electronics Show in Las Vegas.

The three new computer designs consist of 2 different lines. The IdeaCentre A730 is the first model and the C-series makes up the 2nd line. The C-Series is the more affordable line  that will offer 2 models; a touch screen and non touch screen versions. With high end graphics cards being the standard and  the availability of up to 2 TB of memory, these models to compete with high end gaming systems but will be a little easier on the wallet. The non touch screen model will be available in February, while the touch screen version will be available in June.

The IdeaCentre A730 is a super sleek multi touch all in one model.  This model will allow Windows to openly compete with the Apple Mac Book Pro series. But the IdeaCentre A730 has a slight advantage over it Mac counterpart, it is equipped with a Blu-Ray drive. Lenovo has announced that this series of computers will be available in June of 2013 with a starting price of $1,499.

I think the new Lenovo all in one computers offer users a powerful compact computer with the portability of laptop with even more functionality than the new Mac Pro books.

Should you are ever need an all-in-one computer for a short term rental, please check with Rentacomputer.com

Friday 4 January 2013

How-To Get SIMS 3 to work with Windows 8 Computer

I'm writing this due to my experience with the kids SIMS 3 program.  I had purchased Windows 8 netbooks (The new fancy word for laptops), and they truly enjoyed it.  All was well until they tried to install their SIMS 3 program.  Yes, we got the same type of errors that everyone else has been getting.

windows 8 computer sims 3


Is the SIMS 3 program Compatible with Windows 8?

I can't tell you that what I do here will do the job for everyone else, but I sure do hope it works for you like it has for us.   There was alot of talk about Bit Defender (a program) conflicting with the SIMS 3 software, but we didn't have that program installed.  Thus I had to look for other options.

For us?  Windows 8 is compatible with SIMS 3.  You can’t install the program like you would normally is what I found.  If you have YET to install any aspect of the SIMS 3 program on your windows 8 machine?  Skip the Revo uninstaller portion, but do start downloading the patch I link to before you do install SIMS 3 ANYTHING on your windows 8 computer!

If you have installed any portion of the SIMS 3 program on your Windows 8 computer – like my kids did – follow our instructions to completely remove all aspects of it off your machine.

Yes, SIMS 3 support does show you how to do this manually.  I found it is a pain in the butt, and REVO uninstaller can do it quicker.  Heck it may even remove files they aren’t thinking about at EA support.

Below we will speak about completely removing the SIMS 3 off your computer as if it never existed prior.  So you will need to find a way to save your game progress, the extras you may have purchased, etc.  Once you follow my instructions they will not be on your computer anymore.  Save them now before going forward.

I had spoken to EA support line at length a number of days ago, and I followed all their instructions to the tea.  I found after all that work I still had the same stupid error while trying to install SIMS 3 on their Windows 8 machine. I gathered my patience for the next day, and decided that I would try this my way using some of the principals they spoke about on the phone.

Before we start make sure all of your windows updates are complete!

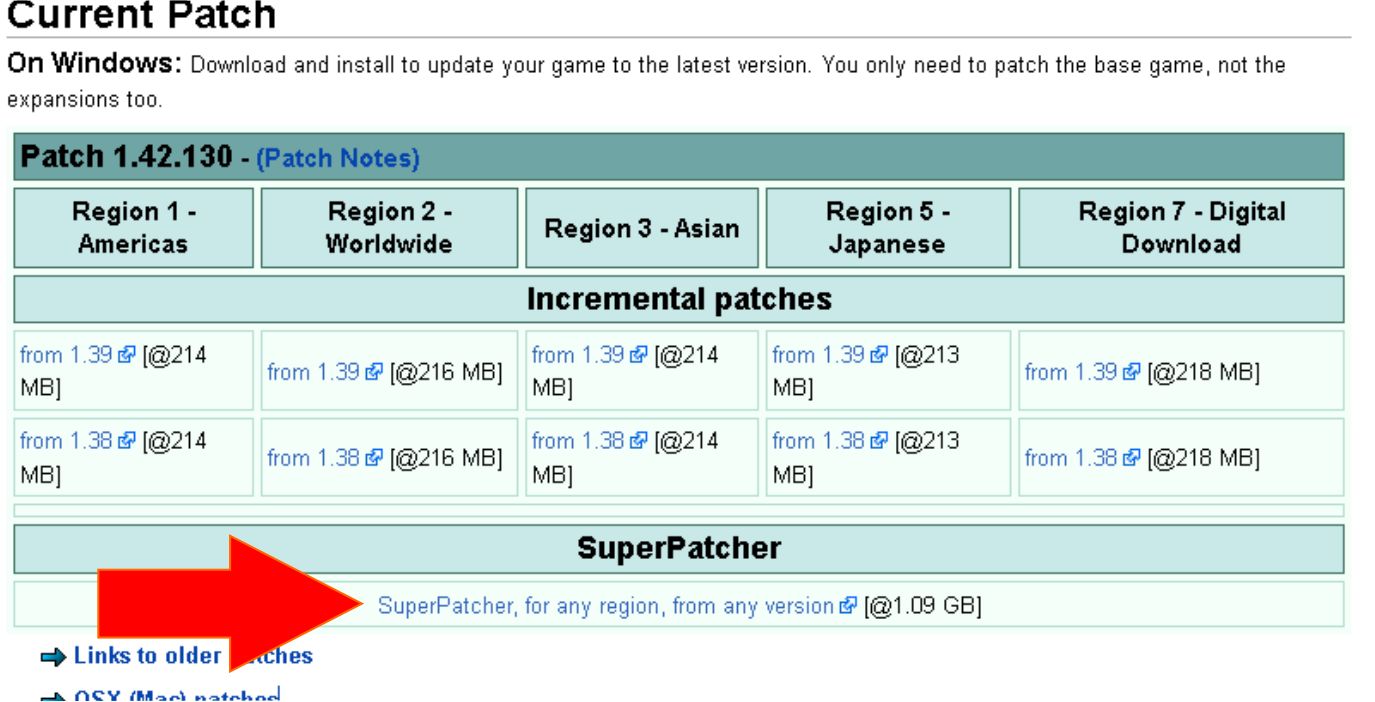
The first thing I did was download what EA support called the SIMS 3 Super Patcher.

Sims 3 Super Patcher

If you look at the file size it seems large to me – it starts with a TS.  I downloaded this to my desktop, and while I waited for it to finish I  did the following to get my Windows 8 machine READY to work with our Sims 3 program.

I would make a ‘restore’ point on your computer in case you have any issues later on. That way if you have any problems you can restore your computer to an earlier time. The Revo Uninstaller does this as well, but I make a practice of doing this manually anyway.

Use Revo Uninstaller to remove SIMS 3 from your Windows 8 Computer

I went to download a free program called, Revo UnInstaller.  You will notice that they have a free option, and what they called a PRO (or professional) option.  I will be purchasing the PRO version at a later date, but to get the ball rolling on the Sims 3 program on their Windows 8 machine?  I used the free version of the program.

Revo Uninstaller Sims 3 Windows 8

If you look to the bottom of the screen it will give you a link to download this freeware.  I did notice on the windows 8 machine that it started to install itself, and yet sent me to some webpage asking me if I wanted to also download some other program.   I didn’t use the second program they wanted to advertise, but finished installing Revo Uninstaller completely.

Once I launched the Revo Uninstaller on windows 8 computer it will scan your system for all installed programs.  This can take some time if you have plenty of programs already on the Windows 8 machine.

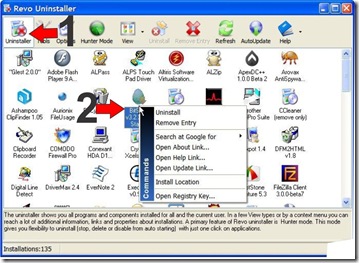
Once the scan is completed - you have some options along the top of the menu.  Select the uninstall option.  (see 1)

Look below and FIND your program icon that you are going to remove – see 2 (it will remove everything - not just icon).

By the way, in my picture below I didn’t use a SIMS 3 icon as an example.


Right click on program icon
Select Uninstall (see 2)

revo uninstaller windows 8

It will prompt you asking you if you are want to uninstall program - click yes.
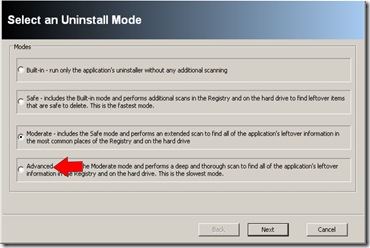
Next Screen is 'Select an Uninstall Mode" I picked 'advanced' on bottom – then click next

revo uninstall mode

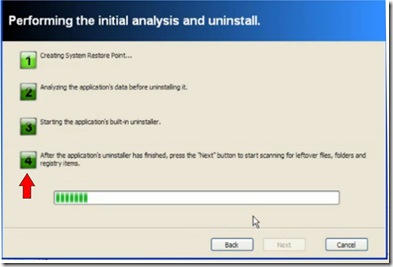
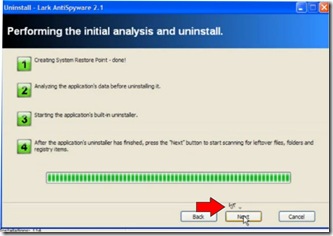
Next Screen is 'Performing the initial analysis and uninstall' screen.

At this point you will see the a list of  4 jobs it will be doing, and in the meantime your normal SIMS uninstall wizard will run.  If you have time to read the 4 steps listed in the Revo uninstaller program?  Step four on the REVO screen it tells you this will happen. 

performing the initial analysis and uninstall

(Keep in mind the REVO uninstaller will launch the SIMS Installshield wizard automatically for you - you don't have to do that part.)

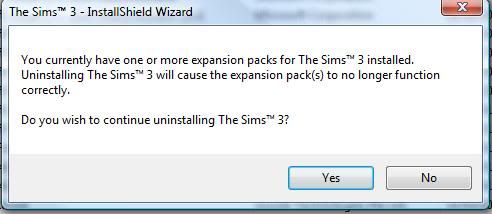
Leave the REVO program alone for now, and run the SIMS uninstall wizard until its completed.  No doubt you will get this message in the picture below, and Click YES this is what we are trying to accomplish!

Do all the steps that the InstallShield Wizard for the SIMS 3 program is asking you to do. 

Once you hit the FINISH button on the wizard – the wizard will close automatically. 

Your Revo Uninstaller Screen should be the only thing present, and you want to hit the ‘next’ button at that point on the Revo Program.

revo next analysis

‘Scanning for leftover information’ screen will be running.  Allow it to finish. then Click NEXT

revo scanning for leftover information


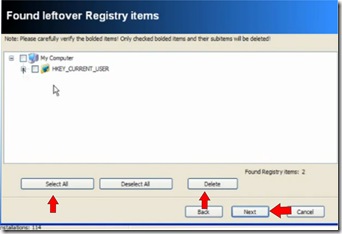
Found Leftover files and Folder or Registry screen will be next. 

revo found leftover registry items

Click 'select all', and then click "delete'. 

You will then get a message, 'are you are you want to send the selected files to the recycle bin?"  Click Yes. 

Scan will happen and when its done - click next.

You may get additional screens afterwards with different names, but we will do the same actions that we did above.  Just select all, delete, YES I want to send to recycle bin– and next!

Do this until the program is DONE! and then click finish.

revo finish

I did the same to remove SIMS 3, all extension packs, and origin using this program.

Once SIMS program, all the extensions, and Origin have been removed - remember to empty your recycle bin.

Sims 3 Super Patcher for the Windows 8 Computer

This is just me, but once I do all this work?  I normally restart the computer as well.  It may not be needed, but that's just me as I said.

I was told to install the SIMS 3 super patcher prior to the SIMS 3 program (ea support line), but it would not allow it due to no SIMS program on system at all at this point.  THIS was a great sign for me! The program is completely GONE!

I reinstalled Origin.  Signed in - went to 'my games' and only installed the SIMS 3 program.  I will not run this program, because I want to do install the super patcher program first (per EA support).  So in others words DON'T hit play when its done!

I then went to my super patcher for SIMS 3 download (first item we downloaded above), and executed the program.  Hopefully, by this time your download we started at the beginning is finished.  It took a while to run, and I left the computer completely alone to let it do its thing.

Once the patch was completely installed?  I was getting excited, and I crossed my fingers and did a little prayer while I launched the SIMS 3 base program.  I almost fainted when it actually did what it was suppose to. 

I told my daughter to let the SIMS 3 program load completely, and don't download any extensions until the program is done loading EVERYTHING!

Sims 3 is Compatible with Windows 8 computers

I instructed her to download one extension at a time - let it load all the junk it needs to - add her purchases, extras, update files etc. on each expansion pack ONE AT A TIME! 

Once she was SURE everything was working on that pack?  Move to the next one.  Do the same thing.

I told her if ONE expansion pack screws up?  STOP, and we will look for the next solution.  At that point you know it’s the expansion pack, and NOT the SIMS 3 program if another error occurs.

So Far so good...we will see, and I hope my journey helped others!  Her SIMS 3 program is actually working on our Windows 8 computer.  Yes, it was an annoying adventure but at least its done for now.