Showing posts with label desktop. Show all posts

Monday, 27 May 2013

How-To Arrange Desktop Icons

How-To Arrange Desktop IconsToday we are going to learn How-To arrange Icons on your computer desktop.
Just so we are clear on the instructions here is a picture of a desktop.  The computer desktop itself is the picture of the hills and clouds! 
The Icons on the desktop in the picture are named:  My documents, My Computer, Recycle Bin, and Internet Explorer.
I’m normally asked a couple of questions about arranging desktop icons or organizing the icons on the desktop.  So lets go quickly over a couple of different options!
First I will go over some more traditional ways to organize your icons, and they show you a way you can organize they WAY you want THEM!
Topics covered today will be:
  • How-To Find Arrange Desktop Icons Menu
  • What is ‘auto arrange’, and how to turn that option off and on.
  • Sort Icons by options, and What do the different options Mean?
  • How To Arrange the Desktop Icons where I want them, and how to organize them by using the Grid. 
  • How to Arrange the Desktop Icons how I want them, and NOT use the grid
First lets go to the spot where all the magic happens!  We need to find the menu to do ALL the changes NEEDED!

Arrange Desktop Icons

We want to find an open space on your computer desktop, and then right click with your mouse pointer ON the desktop, and NOT on top one of the icons.
For example you notice the mouse pointer in the above picture is NOT on top of any of the desktop icons pictured.
Below I have pictured menus that will come up depending on your operating system
Right Click on Desktop
This would be Right Click on Desktop for Windows XP, and we are hovering over the ‘arrange icons by” option. (notice how its highlighted in DARK blue when you hover over it) 
right click on desktop Vista
Right Click on Computer Desktop Menu for Windows Vista when you hover OVER the “View” Option.  Notice how VIEW looks different in the background color compared to the other options.  In this lesson we will be using the ‘view’ area.
right click on desktop windows 7
Menu for Windows 7 when you hover over the “VIEW” option that we will use today. 
Keep in mind you may have to use this step over and over again to make all the changes you want to your computer desktop.  When you select just ONE change the menu above will disappear, and you have to do this step all over again to make the next change. 

How-To Turn on Auto Arrange Desktop Icons

With any of the above operating systems you need to find an item on the list called, ‘auto arrange icons’. Look at the pictures above to see where you might find that option.
If you want the icons to be automatically arranged, click Auto Arrange.  This option is normally done by Default.
check auto arrange
If you see the check mark next to auto arrange that means you have selected it, or it maybe already selected for you (ie: by default). 

How do you turn OFF Auto Arrange Icons?

uncheck auto arrange
Of course absence of the check mark means you have removed the option of the computer desktop being automatically arranged. 
So if you want to turn OFF the auto arrange which is normally the ‘default’ setting for computer desktops hover down and CLICK this option to remove the check mark.  It should look similar to my picture above when turn OFF this option.
At this point the menu should disappear altogether after you made your choice.  If not?  Click on the computer desktop again.

Arrange Icons By Options

Right Click on Desktop
In the Windows XP menu you will see in the above picture a couple of different options. 
What do the arrange Icons By options mean?
Name  -  Arrange icons in alphabetical order by the icon name.
Size  -  Arrange icons in order of file size. If the icon is a shortcut to a program, the size refers to the size of the shortcut file.
Type  -  Arrange icons in order of type. For example, if you have shortcuts to several PowerPoint presentations on your desktop, these will be arranged next to each other.
Modified  -  Arrange icons in the order that the shortcut was last modified.
Hover over to your option, and click on the option you feel is the best for you.  YES you can change that option if you don’t like it to something else!  Just start over by right clicking on desktop once again.
You can find these sort by options for Windows Vista and Windows 7 as well.
Remember to right click on that free space on the desktop once again, and then look for the ‘sort by’ option.
right click on desktop windows 7
You notice the arrow on the right side of this optiVista Icon Sort By Optionson?  If you hover over the SORT by the list of options will appear. 

You are able to pick which you would like to use, or change the option once again if you don’t like it.
Just hover down to your option, and CLICK on it when it highlights.
Your menu should disappear once you make your changes, and if you not?  Click on computer desktop.

Organize Desktop Icons The Way I Want Them

You can move your desktop Icons anywhere you want them on your computer Desktop.
computer desktop
When you have the Auto Arrange Option Clicked – or is in use by default you can’t move your icons around to places you may want them.
The picture above you will see icons arranged all around his picture of a cool car, and an airplane.  You also notice his icons are still lined up, but placed where he decided to put them! 
How do you do that?
First, you need to make sure your ‘auto arrange’ option is turned off like we showed you above.  Right Click on Desktop, and look for this option to make sure check mark is removed.  Hover over and click on the option if it is NOT!
uncheck auto arrange
Notice NO check mark?  It has been turned off!
Now some people still like to see SOME sense of order as far as the icons being lined up orderly.  The computer desktop has what is called a gird.
Once again – right click on computer desktop.
In Windows XP you will find the option for the grid under the Arrange Icons By section. 
Notice that the auto arrange doesn’t have a check mark next to it, but the align to Grid does? (list on right side, under NAME)
Right Click on Desktop
These are the options you want!
right click on desktop windows 7
Windows Vista and Windows 7 are similar, but hover over the ‘VIEW’ section.  Notice the ‘auto arrange icons’ is NOT checked, but the ‘Align Icons to Grid’ is?  That is what you WANT!
right click on desktop windows 7
Now if the grid is to restrictive for you?  You of course do not have to use that option!

Arranging Icons on Your Computer Desktop

I will tell you if you are NEW computer user, or have a new computer at times these menus can be frustrating.  They disappear before your able to make the changes you want, or the menu seems to close before you can see anything.
Be patient, and go a bit slower at times to figure out how sensitive your machine can be.  Its not usual to have to do this a couple of times, and it happens the best of US!
I will mention at times you may need to refresh you computer desktop to see the changes you have done.  When you right click on your computer desktop?  Look for the ‘refresh’ option, and hover over to click on it.  The screen sometimes flutters a bit, and then you can see your finished product!  Most of the time with newer machines this isn’t needed.  You see your changes right away!
I hope our lesson on Desktop Icon Arrangement was helpful!
If something is not clear, or you feel something should be added to our lesson? Please feel free to leave your comment or question in section we provided.


Also please subscribe by leaving your email in the box supplied, and you will received future lessons by email as they come out.

Thank you for reading our How-To Guide for the Computer Beginner

Friday, 29 July 2011

How-to Make a Computer Folder Shortcut to Desktop

computer-file-folder
  These are pictures of computer folders.  computer-folder

Today’s How-to Guide for the Computer beginner will be on Computer Folders.  More Specifically we will make a folder on our desktop.    Some people refer to this as Folder Shortcut on Desktop.

Try to think of a computer folder much the same way as the ones you buy in to store.  Heck you can even make them into some of huge penda flex folders that we see as well.  It really depends on what you use your computer for, and how you want to keep things together.

How To Make A Folder On Desktop


Find an open space on your desktop, and then we want to right click.


right-click-new-folder
<<<< This top menu pops up, and you want to look for ‘NEW’.  You will hoover over (don’t click) on NEW for the second menu to appear.


^^^^^ This second menu opens, and you need to look for “FOLDER’.  At this point you may click on folder.

creates-new-folder
If you look at your desktop at this point you should see a computer folder similar to this one pictured. 

The blue highlight is waiting for you to NAME the folder. You don’t have to ‘click’ anythingJust start typing the name you want to call this computer folder.  Hit your enter key when finished.

I have decided that I want to place my vacation pictures in a folder on my desktop.  I will name this folder photos and push my enter key.  When I double click on the folder I named, “PHOTOS” it will open to show my contents of this folder.  At this point it would empty of course.

Now I have made the decision that I want to make an addition folder INSIDE my photo folder to represent each trip I made.
folder-new-folder

I can do that VERY easy, by looking at the top, and clicking on FILE. 

I will hover over to NEW, and additional options appear.

We will click on our option, “FOLDER”.

The new highlighted spot will again appear just as it did when you made your first computer folder on the desktop.   I will name my first folder TEXAS, and hit ENTER.  I will then click on an open space within this window, and repeat the process of File, New, Folder, and then name the second computer folder ‘SPRINGFIELD’.

I had two trips – one to Springfield, and one to Texas.  I have a folder for each trip inside my PHOTOS folder on the desktop at this point.

photo-folder-trip-names

Notice the Desktop folder name in red, and the two different trip computer folders that represent the locations.  Location one – Springfield.  Location two – Texas.


I went two main cities in Texas as part of my trip.  I went to Dallas and Fort Worth.  I have decided I want to break up my pictures into two additional folders by city name, but IN the Texas Folder itself!

computer-folder-by-cityJust as we did above we will double click on the “TEXAS” computer folder.  I would follow the same directions that we just did for Springfield and Texas. 

Click File, New, Folder, name the folder “Dallas” and hit ‘enter’.  Click on a open space within the open folder.  Click File, New, Folder, and name the computer folder ‘Fort Worth” – click enter.  If you notice at the top once you clicked on Texas?  You can confirm you are in right place by looking at the TOP line I pointed to in Red.

When I double click on Fort Worth or Dallas to place my pictures in those folders?  That top line would read:  Photos – then Texas – then Dallas
or

Photos – Texas – Fort Worth.

This is how I organized my vacation pictures.  I have folder on my desktop named “PHOTOS”, and inside I organized them even MORE by location.  Then in Texas I again organized the by City – Fort Worth and Dallas.  All I have to do at this point is import the photos!

Rename Computer Folder


OPPS!  Did you notice that I misspelled ‘PHOTOS”?  Its says “PHTOS” instead!  Yikes!  Lets fix that shall we?

Close out our folders menu completely, but clicking on the red “X” in the top right hand corner.  We should be looking at our desktop again at this point.

Find our computer folder on our desktop, and then we will again RIGHT CLICK on the computer folder Icon itself!

right-click-rename

A menu will appear once again, and we will move to the ‘RENAME’ section.  Then click on “RENAME

Rename-folder

I will then be presented with the highlighted area once again, and I can correct my mistake!  Remember just TYPE don’t click on the box to edit.


Renamed-folder-shortcut

Now that I have fixed my spelling error – did you notice the appearance of the file folder changed as well?  I copied our first screen shot on purpose so you can see the visual of the difference between what it looked like when we started, and what it looks like now.

Our Final product if you look closely?  You have your ‘main computer’ (outside folder), and additional folders inside (Springfield and Texas).  I think that is NEAT!

 
If something is not clear, or you feel something should be added to our lesson? Please feel free to leave your comment or question in section we provided.


subscription-box_thumb1

Also please subscribe by leaving your email in the box supplied, and you will received future lessons by email as they come out.


Thank you for reading out How-To Guide for the Computer Beginner on Computer Folder Shortcuts for Desktops!!


Monday, 25 July 2011

What is a web browser? Browser window?

what-is-a-browser When I speak to my friends about computers I sometime forget they may not know the basic terms, since  they are a computer beginner after all.

I get these confused looks and questions like:

What a browser?
What is a web browser?

What is a browser window?

I think to myself, “Oh boy!  I guess that would help huh?”  Dahhhhh to me!

Today’s How-to Guide for the Computer Beginner is, “What is a browser or Web Browser?”  We will also touch on Browser windows.

What is a Browser?  What is a web browser?


Browser is a short name for web browser.   YEP!  They are the same thing.

A web browser is basically a software application (or program) that allows you to get onto the internet, and view web pages.

I have chosen three popular web browsers, and have shown pictures of their icons.

Internet-Explorer
  You may have seen this on your desktop, and this is a web browser called Internet Explorer.  It is also called, IE for short.


Mozilla-Firefox
This is another popular web Brower.  Its called Mozilla Foxfire.  It also has a nickname, “FoxFire” for short.


google-chrome
Lastly, this is called Google Chrome, or just Chrome for short.


At this point and time these three seem to be the most talked about.  There are others.    If you wish to open a browser?  You would click on one of icons, and normally you would have one similar to ones I have picture above. 

You had to click one of these (IE, Foxfire, Chrome) icons to get to our How-To Guide for the Computer beginner page that you are viewing now.

Normally, the next question I’m asked is which one is better.  Honestly?  You will get as many opinions as there are web browsers.  I think it is more personal preference.  Internet Explorer (IE) was my first browser, and now I tend to use Mozilla Foxfire.   I actually have them both on my desktop now. 

For whatever reason there are certain websites I can view better in one browser better than the other. 

When you hear people speak about browser compatibility?  That is one of the aspects they are talking about.  There will be some website you come to, and they will tell you right away to view this in IE, Foxfire, or Chrome.  They are telling you their website is compatible with that web browser.

Another example, would be say you pick IE and it has a heck of time loading in order to see the words and pictures – or just outright refuses to show anything.  I would turn around and open this page in Firefox, and it loads right away. 

Keep in mind:  When you have never been to a website before?  Its normal for the page to take while to load so you can see it.


Other times certain parts of the webpage will never be seen in one web browser, but you can see everything on another.  Lets look at an example of what I’m talking about.

what-is-a-web-browser
what-is-a-browser

These two pictures are an example of two different web browsers viewing the same web page. 

As you can tell browser number one is more compatible to view this web page than the second one.  The second browser is missing huge chucks of information.

What is a browser window?


browser-windowWhen you click one of the icons above?  You are launched into a browser window.    Matter of fact you are viewing our blog in a browser window.

In beginner terms? A browser window is a tool used to view websites on the internet. It acts as a "window" to the world wide web. (otherwise known as the internet).

So when you open your browser by clicking on one of the icons I mentioned?  You will be viewing the internet through a browser window.


Make sense?

I hope you understood my How-To Guide For the Computer beginner today on Web Browser, and Browser windows.

If you have comments or question please feel free to leave a comment in our section provided.

Also don’t forget to leave your email in our subscription to have future lessons sent directly to your email.

Monday, 7 February 2011

How to recover recycle bin on my computer

I'm going to start with the easiest of fixes for this.  At times our recycle bin on the computer has moved off the screen, and we just can't see it anymore.

If this fix doesn't work?  You don't have to undo anything, but we will move on to 2 other choices.

Left click on an open space on your desktop.  Then Right Click, and a menu will appear.  You are looking for the option to 'sort' or 'arrange' depending on your operating system.  SORT BY is what my Vista computer states.  This will rearrange your icons on the desktop, and if your recycle bin was just off the screen?  It should be placed in order at this point.  It basically 'rearranges' everything.  Check if the recycle bin is present.

If you have an older operating system like Windows 95, Windows 98, Windows ME, Windows 2000, or even Windows XP?  If you need to recovery the recycle bin Annoyances.org has an article for you, and also software that you will need.

Windows XP can also try the options below first if you wish.  Vista and Windows 7 can use the below to recovery their recycle bin.

When I had got my Vista computer one of the FIRST things I did by accident was 'delete' the recycle bin on my computer.  Can I say I was a bit freaked out by that?
I deleted by RECYCLE BIN!
Some of my friends when they received their computer found their recycle bin on computer wasn't present on their desktop at all.

Where can I find my recycle bin on my computer?
Where is the recycle bin?
 And for those of us that have deleted the recycle bin on our computer we knew we had to find a way to recover the recycle bin. 

How to recover recycle bin?
 Most found the following helpful to retrieve the recycle bin on the computer no matter what happened to it.

I was relieved that it was actually pretty easy.  YEAH!

Left Click
The first thing you want to do is left click on an open spot on your desktop.

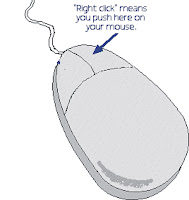
Right Click

You then are going to right click right after that. 


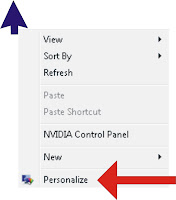
menu option


At this point a menu comes up with choices.

As you can see you want to select 'personalize'.


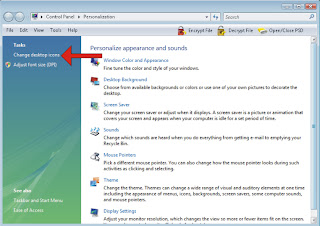
A menu will come up next, and you want to look for Change Desktop Icons - See Red Arrow


Once you click on Change Desktop Icons yet another menu will come up.

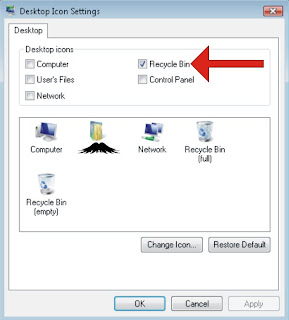
menu option
You want to be sure your 'recycle bin' is marked as above.

If it is?  Delete it - then RE select it!  (then skip next line - *)

*If it isn't go ahead and select it.  You want to be sure that check mark is present.  Some computers may use an 'x'.

After you have CHECKED the recycle bin on your computer look to the bottom of this menu you will see the 'apply' button.  We want to click to 'apply' for this change (recovering the recycle bin on your computer).  Then click 'okay'.

At this point you can get rid of the rest of the menus that we used if they are still present.  Look to the top right hand corner, and click the "X" to exit out of them.

You should see the recycle bin on your computer desktop at this point.  If you don't see it try one more thing before I show you a work around.

Left Click an open spot on your desktop like we at the beginning.  Right Click again as we did as well.  We will NOT select the 'personalize' option, but the refresh option this time.  Here is our picture again, and you notice the third option down says REFRESH.

menu option

At times our desktop just needs a bit of refresh in order to show changes.

If all else fails, and you STILL don't have a recycle bin on your computer?  Microsoft recommends this 'work around'.  If you are using Windows XP you may wish to go to the annoyances.org for your work around.

   1. Click Start, and then click My Computer.
menu option

   2. On the Tools menu, click Folder Options.
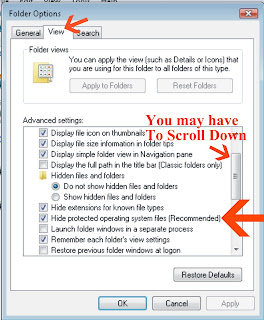
menu option


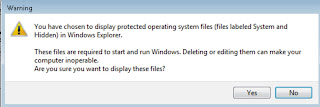
   3. Click the View tab, and then click to clear the Hide protected operating system files (Recommended) check box.
menu option


   4. Click Yes when you receive the warning message, and then click OK to close the Folder Options dialog box.
menu option

   5. Click Folders on the toolbar.

      Note If Folders is not visible on the toolbar, point to Toolbars on the View menu, and then click Standard Buttons.
   6. In the left navigation pane, under Folders, locate the Recycle Bin folder, and then drag the Recycle Bin folder to the desktop.
   7. On the Tools menu, click Folder Options.
   8. Click the View tab, and then click to select the Hide protected operating system files (Recommended) check box. Click OK.

Note This procedure does not re-create the original icon. However, this procedure restores most of the features of the Recycle Bin. This includes the following:

    * Delete a file by dragging it to the Recycle Bin icon on your Desktop.
    * Retrieve a file that you deleted by double-clicking the Recycle Bin icon on your Desktop, right-clicking the file that you want to retrieve, and then clicking Restore.
    * Empty the Recycle Bin by right-clicking the Recycle Bin icon on your Desktop, and then clicking Empty Recycle Bin.

Note When you use these step to work around this problem, you cannot right-click the Recycle Bin shortcut to access the Recycle Bin Properties. To set properties for the Recycle Bin, follow these steps:

   1. Double-click the Recycle Bin shortcut on the Desktop. The Recycle Bin folder opens.
   2. In the upper-left corner of the Recycle Bin folder, right-click the Recycle Bin icon, and then click Properties.

If this procedure did not fix the problem, you can contact support (http://support.microsoft.com/contactus) .

-----------------------------------------

I hope this helps you recover your recycle bin!

Don't forget to submit your email below to have future lessons sent to you!  Don't worry I don't spam, and if you can stop them at any time!

Question?  See the comment button below!

Friday, 27 March 2009

What is a Task Bar?

The Task bar is something you will use all the time, and believe or not in time it will become second nature. 


Today’s How-To Guide for the computer Beginner is What is the Task bar?  We will also go into the different parts of the task bar. 

You can see a small screenshot below, and if you can't see it clearly go to the picture directly on photobucket!


windows-taskbar

Most of the time you will find the taskbar at the bottom of your screen.


One the far left side of your taskbar you have your start button, start-button


and all the way to your right will be your computer clock. computer-clock

A taskbar is a visual device on the desktop that typically shows the user which applications (tasks) are currently active and running. Taskbars such as those in Windows operating systems also include icons for commonly-used utilities such as the system clock and antivirus software. In some systems, the user is allowed to modify the contents, location, or appearance of the taskbar. 


Different Parts of the Task Bar


Today I will go into a brief description of each part of the task bar, and in future lessons will go into more detail of the sections of the task bar.

start-menu

start-button


As we mentioned before the far left portion of the task bar is the start button that you hear people speak about.


When we click the start button we see a start menu.  We will speak about the start menu another day.

The second section of the taskbar has changed quite a bit in time.  I will write briefly about how this section generally evolved with each new Windows Operating System.

Next to the start button that opens the start menu you have the

Quick Launch Bar


The Quick Launch Bar was introduced with Windows 98, but was starting to be radically changed by Windows XP.quick-launch-bar


The Quick Launch bar was program icons that you use often.  One click and it would launch the program.  The red arrow points to the quick launch bar area.


The black arrow shows a double chervon (double arrow symbol), and when clicked shows additional icons that can be launched as well.quick-launch-bar 

You can see in this picture two bar looking items that separate the start button, quick launch, and then the middle section.

Some people like to change the programs that are in their quick launch bar, and we will speak about that another day.

Right next to the quick launch bar you have the middle section, which shows you which programs and documents you have open and allows you to quickly switch between them.


taskbar-open-iconsAs I mentioned before the task bar lets you know what ‘tasks’ are currently open.  In older operating systems you could have MANY tabs that looked similar, and it would fill the space up quickly.

windows-xp-taskbar-grouping


With Windows XP they started what they call task bar grouping.     They basically would ‘group’ all similar files together.  In the example I have pictured they grouped all Microsoft Word Documents together.

Keep in mind normally you would see your document name in this example if you gave the document a name that is.

They made this change so when you have like the picture shows 10 office documents open at once?  You can quickly get the one you need at the time, and switch to a different after that.  


vista-taskbar


When Vista came along all you had to do was hoover (See picture – windows photo gallery), and the Windows Desktop Manager would give you an image of the file or program you have open.


task-bar
  Instead of a bunch of grey buttons for each window that is open?  Vista (and XP) tend to show you a white down arrow that tells you that you have more than once window open.  In this case I have more than one webpage on my task bar.

taskbar

When I hover over the firefox icon in this case my web pages will appear like pictured.  If I hover again on top of the title?

The computer will give me a complete title of that the page in question.


Windows 7 changed it the taskbar once again.  When I hoover over (don’t click) that section the web pages with descriptions will pop up to tell me what they are as well.  


windows-7-jumplist
When you go to open a recently used program from the start menu the files you created recently show up as well.  If you look closely at the picture the ‘recent’ section (top right hand side)shows names of flowers that this person may have used in the PAINT program.  These files show up when you hoover over the program name.


windows-7-taskbar

These file names also pop up when you click the program icon in the task bar.  

Notice the “RECENT” file names this user created for meeting agendas.

If you look below that you will see the WordPad is the program they used to create them.  Windows 7 also makes it easier to place your programs of choice in the quick launch area.  

Notice the “Unpin this program from taskbar”.    

This user PINED WordPad to their taskbar for quick use.  If they change their mind later?  They can unpin it just by clicking where it prompts you to.


windows-7-icon

  Unlike Vista that gives me a white down arrow Windows 7 almost gives you the impression you have a couple of sheets of paper.  Notice the layers in the picture.

The notification area, which includes a clock and icons


notification-area-clock
  The area includes programs you tend to use once you turn the computer on.  It could be sound, virus protection, settings for printer, and important software.  Notice the WHITE arrow at the very left of this picture.  If you click on that you will see ALL the programs serviced by this portion of the task bar.  

This is for Vista.

windows-7-notifaction area

Windows 7 looks something like this.


The smaller icons as I mentioned are important sections of your computer
speaker
This is my speakers icon.  When I hoover over that icon I get a notification like this

speaker-notification

This is the same area in which you will be notified (with new operating systems) when an update to one of your programs is available.  Below is a Java Notification.

java-notification

Lastly, you have your clock that we have already covered in another lesson.


Thank you for reading our How-To Guide for the Computer Beginning, and our brief overview on the task bar.

As always don't forget to leave a comment or question if you have one in the area supplied below.

If you leave your email in the box I supplied future lessons will be sent to you by email!